Amazon Banner

Showing posts with label Crochet Pattern. Free Pattern. Show all posts

Tuesday, January 27, 2015

Free Crochet Pattern Buttoned Wrist Band


Finished size:  9 inch long X 1¼ inch wide.
Gauge:  13 csc in 4 inches
Materials:
Small amount  Worsted Weight yarn
Hook to obtain gauge. I used an I, US 9, 5.5mm
Scissors
Yarn needle
Sewing Needle with thread
1- 1 inch Button

Special Stitch:
Center Single Crochet


Pattern:
  1. Ch 31, turn, sc in back loop of 2nd ch from hook, and each to the end. (30sc)
  2. ch1, turn, sc under the 3 loops of the same st as ch. (see Picture) csc in each st across row. be careful not to stitch into turning ch. (30 csc)
  3. ch1, csc in same as ch, sl st in center of next st. ch 3, loosely, sk 3, sl st in center of 4th st.  csc in next, and each to finish the row. (25 Csc, button hole using 5 st )
  4. ch 1, turn, repeat row 2, to sl st of button hole. sc in top loops of sl st. 3 sc over ch 3. sc in next sl st, sc in last st.(27 Csc, 3 sc)
  5. ch 1, turn, repeat row 2.  cut yarn, bury ends.
  6. Position button so that band fits wrist comfortably. Use needle and thread to sew button in place.(30 Csc)

Chain

sc in back loop across


sl st, then ch 3 for Button Hole.


sl st to the 4th st, then resume Csc across row


A cropped tight view of the fabric in this design.

For a  Printer Friendly PDF, Click HERE
Printer Friendly is all Black ink, No Photos

This little band can be a great scrap buster, perhaps BFF Bands, done in matching colors?  Maybe
the Designated Driver for the night out?  Sometimes the Lounge offers free NonAlcoholic beverages to the DD. This could be a very cool way of identifying them in a group.  Just a thought.


Until next time
Happy Hooking
Becky
Sundays Down Under


The Easyloop Fauxchet Yarn Tool Banner

Friday, April 25, 2014

Put your heart into it Free Kitchen Scrubbie

In case you have not caught on, I am a fan of really useful crochet.

Would you like to add this gem to your arsonal?  We can get started now.
For this project, you will need

N Crochet Hook (For body of Heart)
H Crochet Hook (For surface crochet of Netting)
Worsted Weight Cotton Yarn, 3 strands, in any color you like
Coarse Nylon Netting, cut in 1 inch strips
Scissors
Needle
A Pattern, I chose this one from Planet June  ( I have used a Heart shape many times, but recently discovered this pattern, I truly Love it. Much better shape, and easier construction than my original..)

Using Junes Pattern for the Large Heart, with 3 strands of cotton and the N hook, construct your foundation, exactly according to pattern for round 1.
For round 2, I want you to follow the pattern, with a slight modification of the multiple stitches into one. For those, I want you to place the last stitch of the group in the post of the stitch, thus spreading your placement just a smidge. This will provide a better base for your netting layer. (See the pictures for further explanation)
See the V there, one string is red, the other is yellow, your final stitch of the group will be placed there, to allow a bit more movement in your yarn. 3 strands can get bulky, even with a large hook. By spreading the Love, your Heart will be in better shape.
This is how the stitch looks after you have placed the final stitch in it. Kind of cool the way it is all secured there.
The third round is made exactly according to June's pattern. Isn't this great, the shape is so perfect, It goes together so quickly. Oh, for the tip of the point, place those stitches the way I had you do for round 2. (All of them)

Now for the closing, I went a bit nuts with the pictures, but it makes a difference in the finished look, as well as how your ends will be dealt with.  After you make the last stitch of round 3, remove the hook, turn the heart over, and follow these simple steps.
Insert hook through fabric, in the next stitch

Grab working loop, and pull it through to the back of your work.

Yarn over and pull it through to seal the slip stitch

Pull the yarn through, far enough that you have ends to work with,
about 3 inches is good. Cut in the center of the loop.

Using each end individually, secure this, tugging each one, but not pulling so tight as to snap your yarn.
Just a little more to do before we add our netting.  it matters, hang in there.
Using your H hook now, Use loops along the back or your Heart to secure the ends you just cut
Insert hook under loop, grab yarn tail and draw it down

Repeat this with another place that seems logical to you, the goal is to bring this tail
to the end from your starting ends at the center of the heart.

Once the tails are close enough, tie each color together once,
like the first step in tying your shoelaces. don't form a knot,  secure each of the three yarns this way, then grab a needle to bury each of the six ends, going out from the center, in different directions.

Whooo Hooo, Heart is done, and for the first one, it took longer than you thought, simply because you were going back and forth between June's instructions and mine. The next one will take about half the time, because it really is simple once you have done it!

Lets look at our heart now, to determine which side to place our netting. This piece is crochet in the round, with no turns, so there is a designated right side, and wrong side.  The netting will go on the wrong side, because of the loops that naturally form there. So, for all you rebels out there, this is a time when the wrong side is the right side!  Feel better now?  I Do,  I tend to be somewhat rebellious. It is fun, keeps people wondering.
Okay, Here we go with a ton of pictures.  If you don't like it, feel free to amble off into your own experience. Just because I lay out guidelines here, it is not mandatory for you to follow them. If it were, you would not be looking at this, as I would not have been able to do it!
Just take a gander at all these loops we have to work with.  to keep your netting from ripping, and the heart from getting really sloppy, I encourage a minimum of 2 strands of yarn for each stitch base.

Starting in the center of the heart, you will see the stitches have 3 legs, the first in the center hole, the second, and then the top, where the next round is worked. I like to use the second leg, or bump if you will. insert hook under it, just on the surface, not all the way through your fabric. pull netting through to form a working loop.  Ch 1 to secure it. Keep the netting somewhat loose here, so as not to break it. The hook should slide pretty freely inside the working loop

Insert hook under next stitch loop, draw netting through, and sc, ch 1, and repeat. working around the center, under the second bump of the stitch

As I said, try to be sure you have two strands of yarn that you attach the netting to prevent a fragile scrubbie. 

When you have the first round done, it is sort of heart shaped, but not likely to be perfect.
You can cut your netting, or work in a spiral, out from the center.

Where the rounds meat, there are an abundance of loops to choose from, it does not matter,
as long as you remain consistent in your choice, and put the ch 1 between each sc.
this allows more abrasive quality, and prevent the netting from being too tight.
I chose to spiral my netting, I am not sure I like it, but I do Love the colorfulness of this sample.
I did it so I could better show details in pictures.
My Grandchildren have all shown me that hearts
do not have to be red, pink and white anymore.
if there is a color you like, by all means, go for it

And this is the washcloth side of the finished item.
perfect for the counter, tabletop, or where ever you need
a clean wipe down, with out any abrasive roughness.


Now, The Legal stuff.  This is my creation. I used someone elses pattern, is it mine? Yes, and NO!  June from Planet June designed the Heart.  I linked to her pattern, with her permission.  In the descriptions of the changes I made, I did not reveal her pattern on my blog post.  I am taking credit for the SCRUBBIE, and giving credit to the designer of the original pattern.

This can be done with any motif by the way. It could be a flower, a bow tie, almost anything out there. I chose this one for it's superior quality.
Special Thanks to June for the pattern, and her gracious permission to use her work in this way.

I guess I best say. DO NOT PUT THIS IN THE DRYER it will melt!  you can send it through the dishwasher, if the heat dry is turned off.
If you want to add a hang cord to allow it to air dry, simply chain 30 with a single strand of cotton yarn, slst to form a loop.  cut your yarn and hide your ends. slip the loop through the fabric, pull the rest of the loop through that. There ya go, licket split. good to go!

Until Next time
Becky


Saturday, April 12, 2014

A Free Easter Hat from , graph hat pattern review

This pattern from Manda Nicole crossed my vision a couple weeks ago, and I just had to take pause.
Easter Graph Hat
 I was so strongly drawn to the symbols used.  It seemed so special to me, Something for the Easter Season that had nothing to do with fertility and rebirth, and yet, it did.


A Christian faith is all about the rebirth. The forgiveness of Sin and rebirth for the truly repentant man, Through the sacrifice of our Lord, Jesus Christ.

I do not intend to stand on the pulpit here, so please do not run off, but I also do not want to just say Nice Hat, and move on. These symbols represent each step of the grueling task Christ took on, because his father wanted to offer man a way out of their trap.


You can find the story in any of the first four books of the New Testament, Matthew, Mark, Luke or John.  My favorite is Luke, somehow, the writings there always felt easier to grasp.


This is an easy enough pattern to follow, If you are a graph person, it is there, If you prefer the written pattern, she has written each round out.  She has provided color pictures to get the graphic to show well. It is a really Nice pattern, and an amazing way to honor the season.  Written for the entire family, from baby size all the way to adult.

When I chatted with the designer about writing this article, I asked about her feeling on my adding a floppy brim to this hat, for a little girl, I was thinking about my granddaughters spring Sun Hat.  She actually loved the idea.  My granddaughter on the other hand wanted me to change it, and put in flowers.  This was not the concept at hand, and so I moved away from the idea.

It would be simple enough to do, You would want to be sure to start the graph pattern one round sooner than the instructions say, and instead of using the round of fpsc at the bottom of the pattern, follow the instructions for the brim I offered on this pattern.  It would also work well to use a cotton yarn, for a more stable appearance with breathability for the warmth.

It is my hope that you discover joy this Easter Season. The Love of the Lord is beyond words, and yet not everyone is in the right place to accept it. No judgments here, it is not my place.

Until next time

Becky


Saturday, March 22, 2014

I am Loving Life,

Good Saturday Morning Everyone.

Has Spring started to appear at your house yet?  I swear the calendar said it was here, and so did Mother Nature.
The sky was clear, the sun was shining, the breeze let me know it isn't all warm yet, but WOW!  I busted hump, and got quite a bit of the Winter Dead and Dread out of my yard.  I think I could spend another 2 weeks moving things around and still have plants to divide. Funny how quickly it gets away from me.

This has been a busy Month. Lets catch up on a few things.

Oh, I am the guest Blogger this week at Crochet Addict UK, , I was so honored when Sue invited me to do it.  Be sure you take a peek around her page, she has some lovely things to share with you.


Red Heart Yarn shared the Skinny Swanky Scarf Pattern I wrote with the review of the Boutique Swanky yarn.  This was both on their Pintrest Board, and their Facebook Page.  I really don't know if that is unusual or par for the course, but for me, it was AMAZING!  I couldn't help it, I cried.


The Webinar "Discovering your Audience" Has been rescheduled for April 23, 2014.  I think that is Administrative Appreciation Day. formerly known as Secretary's Day.  Kind of Neat, for any of us old enough to remember the effort that was placed on honoring a part of the business that always took the crap.

Martiel felt so bad about the way this worked out, she is adding some extra content to the online classroom.

I got up this morning to discover that Oombawka Designs shared my Swanky Scarf Pattern in her Blue Pattern Round-up yesterday.  There are some really pretty patterns being featured. I encourage you to go look.

I want to tag another designer friend of mine. Kathy at ELK Studios creates
the most breathtaking Summer Hats. 
Very Southern Style, Very Classy.
 Here we are at the beginning of the Spring Season. Now, I am not privy to any secrets, but keep your eyes open, there is a new design coming, I can feel it!


This one, well, it was just something I ran across this morning, and fell in love with it's simplicity, and perfect Baby Gift quality.
It is not a free pattern, but the Polar Bear Lovey
from Heather Gibbs is adorable.


I have a new pattern coming this week as well. As I said I have been busy. A tester is finishing up with it, so once I have all the results back, and get the darned thing typed up, I will share it with you.

Until next time

Becky


Monday, March 10, 2014

Skinny Swanky Scarf Product Review and Pattern

A few days ago, I received a surprise package from Red Heart Yarns. Products for me to review, and create patterns to give you.  I am excited, and can hardly wait to share all this lovely with you.  I need to stagger it though, to give each item it's proper place and attention.
The first Item I bring you is this Skinny Swanky Scarf, created with Red Heart Swanky Yarn.  It is soft, full of stretch, and glitz. Bring on the Bling. A perfect accessory for adding sparkle. Graceful Drape in this one is unexpected and fun.

For a Printer Friendly PDF of this pattern, Black ink only, no photos,  CLICK HERE


One Skein of RED HEART SWANKY will make 3 of these scarves, so there is a real value to this product.


Supplies

Swanky Yarn  About 65 yds
K or N Crochet Hook. You want lacy, undefined stitches for this scarf.
Yarn Needle, not too thick, as you want to interweave fibers when you bury ends.
Scissors

Gauge is not important to this accessory.
Finished size   Relaxed, About 2.5 inches X 70 inches
                 Blocked  4.75 inches X 72 inches

1) Chain   162   Loosely,  HDC in bottom loop of 4th ch from hook.  Ch 2, sk 2 ch,  HDC in the next 2 ch. Repeat across the chain. End with 2HDC. keep your HDC going into the botom loop of the chain, you will have a finished look, with out having to do a border stitch.

2) CH 5, Turn, Skip first  st. 2 HDC in ch 2 sp, ch 2, 2 HDC in next ch 2 space. Repeat across row. Place 1 HDC in top of turning ch.

3) CH 2, Turn, 1 HDC in ch 2 space, ch 2,  2 HDC in next ch 2 space Repeat across row. End with 2 HDC, 1 in space, 1 in top of turning ch.

Repeat rows 2 & 3, two more times. Cut yarn about up to the next sequin and pull through loop. Use needle to bury the end, crossing rows, and doubling back.  If sequin is too close, cut just before the next, and trim off the one in between.

The results are so Pretty.

I both Love, and Hate this yarn.
The line between the two is so thin.
I am a center puller. With the sequins in this product attached with a tiny thread, they tend to catch and pull.  When I tried unwrapping from the outside, I found that I had to manually maneuver the ball to unwind it without snags.
There is a ton of stretch to the scarf I made, which leads me to believe that for a garment, such as a top, this product may be super perfect, giving shaping without fussing over modified stitch counts. But, would there be too much Bling? That would be a personal decision.
The color in this is rich, intense and magical. There is a hint of variation with the shape if the sequins, the tone of the thread they are secured with and the side by side fibers of the yarn itself.  It is easy to shove the hook through the yarn, so I recommend watching what you are doing, rather than the TV. Once I had the second row on, It was a dream to work with. Watching it come together was fun. The snags do not hide in this lacy pattern, so take your time.

In conversations with other designers, I hear that for smaller, tighter stitches they had better luck. I have a fair amount left, so I will do another pattern using this product, and test that for myself. You will have to stay tuned for the next pattern and result.

Until next time
Becky

Again,  Printer Friendly PDF, Click Here
Crochet Design is my job.  It is how I pay bills, and buy groceries.  This pattern is available free, on my blog. By downloading the PDF, the need to visit my blog, is eliminated.  I will not be paid by advertisers.  It does not eliminate my need to eat.  Thus the need to charge for the PDF. I know you want me to be able to eat, so I can continue to design for you.  I would not expect you to work your job without compensation.

Thursday, February 27, 2014

Textured Mary Jane's ~ New Born Size

I have a customer, a lady I really enjoy talking with, and sharing thoughts and ideas with. Another friend of hers just delivered her first baby girl.  I could not resist adding to the order a pair of Mary Jane's. This is a pattern I have kicked around for quite some time, just did not have a platform to share it.  I hope you will enjoy making these, and of course, share the link with any and all your crochet friends.

For a Printer Friendly PDF Version of this Pattern, Click here

The pair pictured here is the slip on version, more like Ballerina Slippers. These tend to stay on pretty well, because of the shaping at the top of the foot. This next picture is showing 3 variations on the same pattern, Textures, and smooth Mary Jane's, and the textured Ballerina Slipper. To create the smooth shoe, create all your stitches in the traditional manner. The shoe will be a smidge taller, great for the baby with thicker feet.


Round 1
Using Worsted Weight Yarn and a F (3.75mm) crochet hook, ch11, 2sc in 2nd st from hook, 1sc in next 8 sts, 4sc in last st, Working down the other side of the chain, 1sc in next 8 sts, 2sc in last st  (24 total stitches)  sl st to join.
Round 2
Ch2 (count as st), 3hdc in next st, 1hdc in next 9 sts, 3hdc in next st, 1hdc in next st, 3hdc in next st, 1hdc in next 9 sts, 3hdc in last st, sl st in top of ch2  (32)
Round 3
Ch1 (count as st), 1sc in next st, 2sc in next 2 sts, 1sc in next 5 sts, 1hdc in next 5 sts, 2hdc in next 2 sts, 1hdc in next 2 sts, 2hdc in next 2 sts, 1hdc in next 5 sts, 1sc in next 5 sts, 2sc in last 2 sts, join W with sl st in ch1 to join  (40)
Round 4 (color change optional here)
Ch2, 1hdc (3rd and 4th loop) next st, and in ea st around, sl st in top of 2ch to join  (40) see highlighted link for instruction on this technique
Round 5
Ch2, fphdc on next st, bphdc on the next st. repeat, alternating around, sl st in top of ch 2 to join (40)
Round 6
Maintaining post st pattern, Ch1, 1sc in next 2 sts, sc2tog, 1sc in next 8 sts, hdc2tog, dc2tog five times, hdc2tog, 1sc in next 9 sts, sc2tog, 1sc in last 2 sts, sl st in ch 1 to join (31)
Round 7
Ch1, 1sc in next 12 sts,  fpdc2tog three times, 1sc in last 12 sts, sl st in ch1 to join  (28)
Round 8  Finishing.
you may sl st around entire shoe for a slip on, ballerina look, (as shown in the picture above) or you can choose the straps for the more traditional Mary Jane look.
For Mary Janes:
Right Shoe:  Sl st in the first 10 st, ch 11, sc in 5th ch from hook, and in the next 5 ch. sl st in next sc of shoe and around. Remove hook from working loop, insert hook in next st, from inside shoe, pull loop to inside. Cut yarn, and draw end through loop. Bury all ends.
Left Shoe: Sl st in the first 18 st, ch 11, sc in 5th ch from hook, and in the next 5 ch. sl st in next sc of shoe and around. Remove hook from working loop, insert hook in next st, from inside shoe, pull loop to inside. Cut yarn, and draw end through loop. Bury all ends.
Sew Button to edge of shoes.

Until next time,
Becky

Again, the Printer Friendly Version (black ink only, no photos) is available,  at this link
Crochet Design is my job.  It is how I pay bills, and buy groceries.  This pattern is available free, on my blog. By downloading the PDF, the need to visit my blog, is eliminated.  I will not be paid by advertisers.  It does not eliminate my need to eat.  Thus the need to charge for the PDF. I know you want me to be able to eat, so I can continue to design for you.  I would not expect you to work your job without compensation.

Thursday, February 13, 2014

How's About A Hat Pattern

 For this project, You will need aprox 100 yds of Super Bulky Yarn. I used Lion Brand Wool Ease Thick and Quick It behaves the best for this pattern.
An N crochet hook
A Large Eyed Needle for burying end
About 2 to 21/2 hours.

This hat is worked in a spiral, so stitch markers may be helpful, but are not required.
This hat is very stretchy. As it fell off the hook, it measured 18 1/2 inches. with just a bit of tugging, it quickly stretched to fit a 24 inch head. I do have a relaxed hand. If you crochet tightly, try a P hook. flat top is 7 1/2 across.


This pattern is available in my Craftsy Shop,


For a Printer Friendly Version of this pattern, (text only , Black Ink Only, No Photos) Click Here
To add this to your favorites on Ravelry, Click Here

Crochet Design is my job.  It is how I pay bills, and buy groceries.  This pattern is no longer available free, on my blog.  I know you want me to be able to eat, so I can continue to design for you.  I would not expect you to work your job without compensation.

Thursday, February 6, 2014

Zen Baby Legs Crochet Pattern

Blogging is so brand new to me, I have decided I like it, I have also decided that if I want people to read my blog, I have to read others.  I have also decided that it might be nice if I share a link to a post from another Blogger with you. Not Just any post, but one that strikes me that day. Today's is from Beatrice Ryan Designs.  She impressed me today See the link there in RED

Now, on to my offering for the day:

This pattern is so cute, if I do say so myself.  My grand daughter loves leg warmers, sometimes.
She has her favorite colors, and her favorite features. Soft, not too textural, not too tight, but not so loose they fall down. Her latest request is something to keep them from pulling up too much when she does have to pull them up. (like after running or dancing)

I started these Wednesday Afternoon, and was so excited. It was just a thought, The more rounds I did, the more I liked it. They are way too cute, They are light, Airy, delicate, but not flimsy. A true break from the weighted down heavy we have needed this winter season.  I am so ready for spring.

I posted a picture on face book asking for name suggestions, and I got a few, I have not quite found the one that grabs me, so I am waiting.

What's say we start with the pattern?

Starting with a soft, fine weight yarn, and an H hook
confirm your gauge of 14 DC and 8 Rows in 4 inches.
too many stitches? go with a larger hook, Not enough? yup, smaller hook.  Too Short, Think Tall as you work your stitch, try not holding your working yarn so tightly. Too Tall, Well, aren't you an odd ball. hold on to that yarn just a little.

Once your gauge is confirmed, you will have no problem making these wonderful leg warmers for any child.  This is written to fit a 4 to 6 year old.  If I have enough interest, I will do the math, and add more sizes.

Fdc 29, ch 3, and join to the base of your first dc.
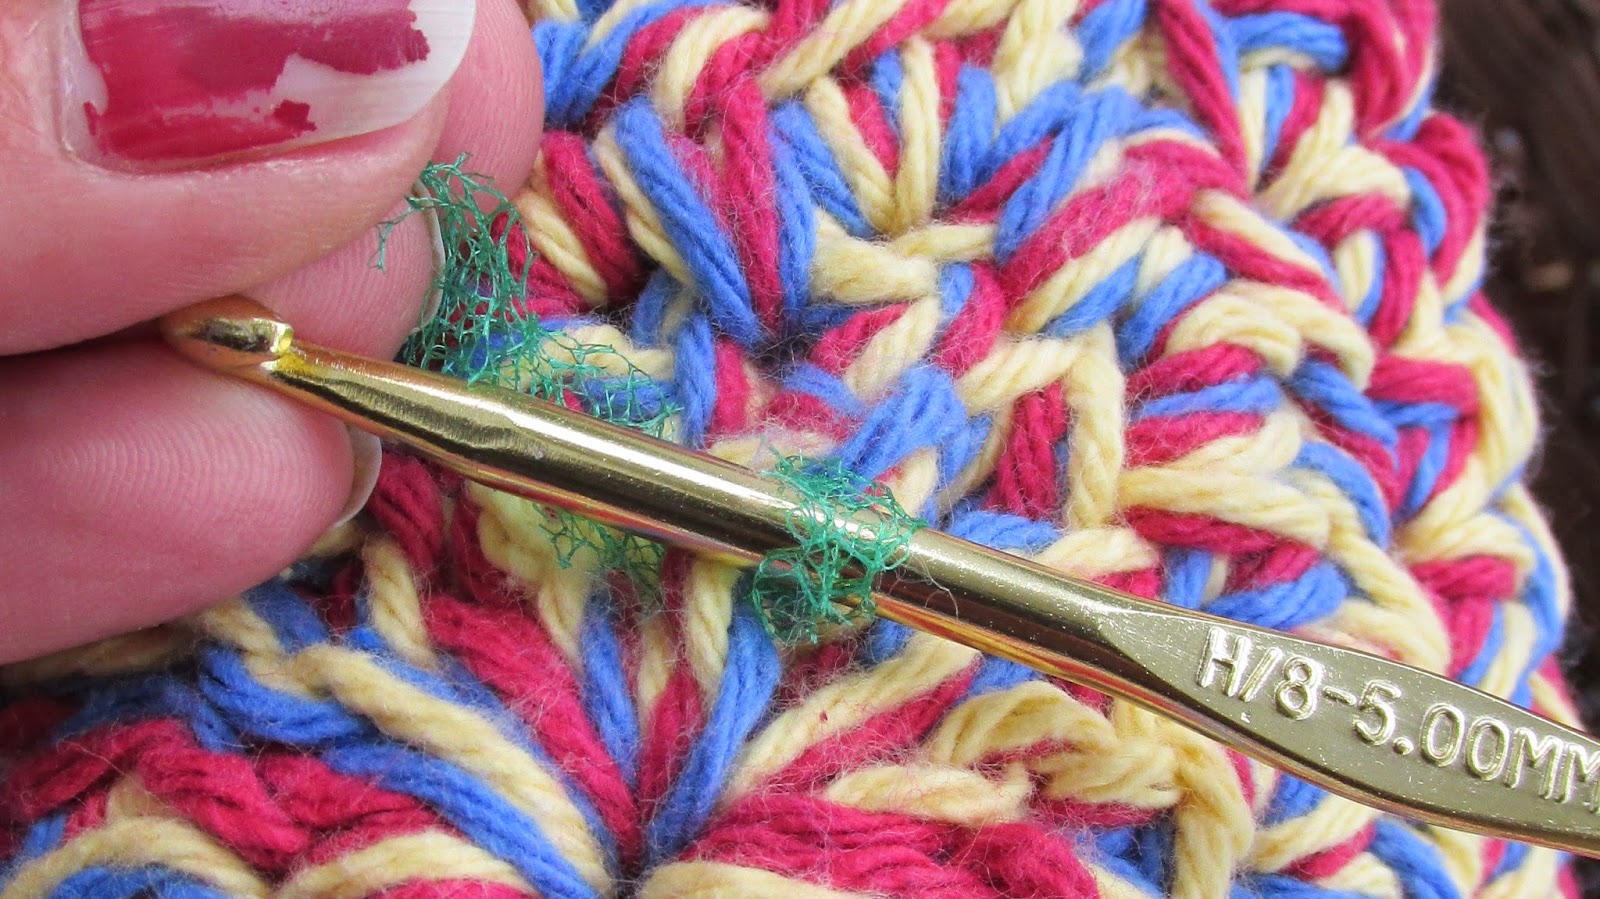
if your Foundation DC's look anything like mine, you are going to LOVE this technique.
 The stitches themselves are fine. It is the Eyelet lace look at the bottom that I am unhappy with. This one is pretty consistent, sometimes the loops are different sized, and pulled askew. Looks like one of the kittens got hold of it. Even though it is getting better, this is not the edge I want, so, we are not going to use it.
 Here you see that I have ch3, and slst to the foundation, where I would have built the next st. This gives us 30 total st for this round. Except, it isn't a round,  yet
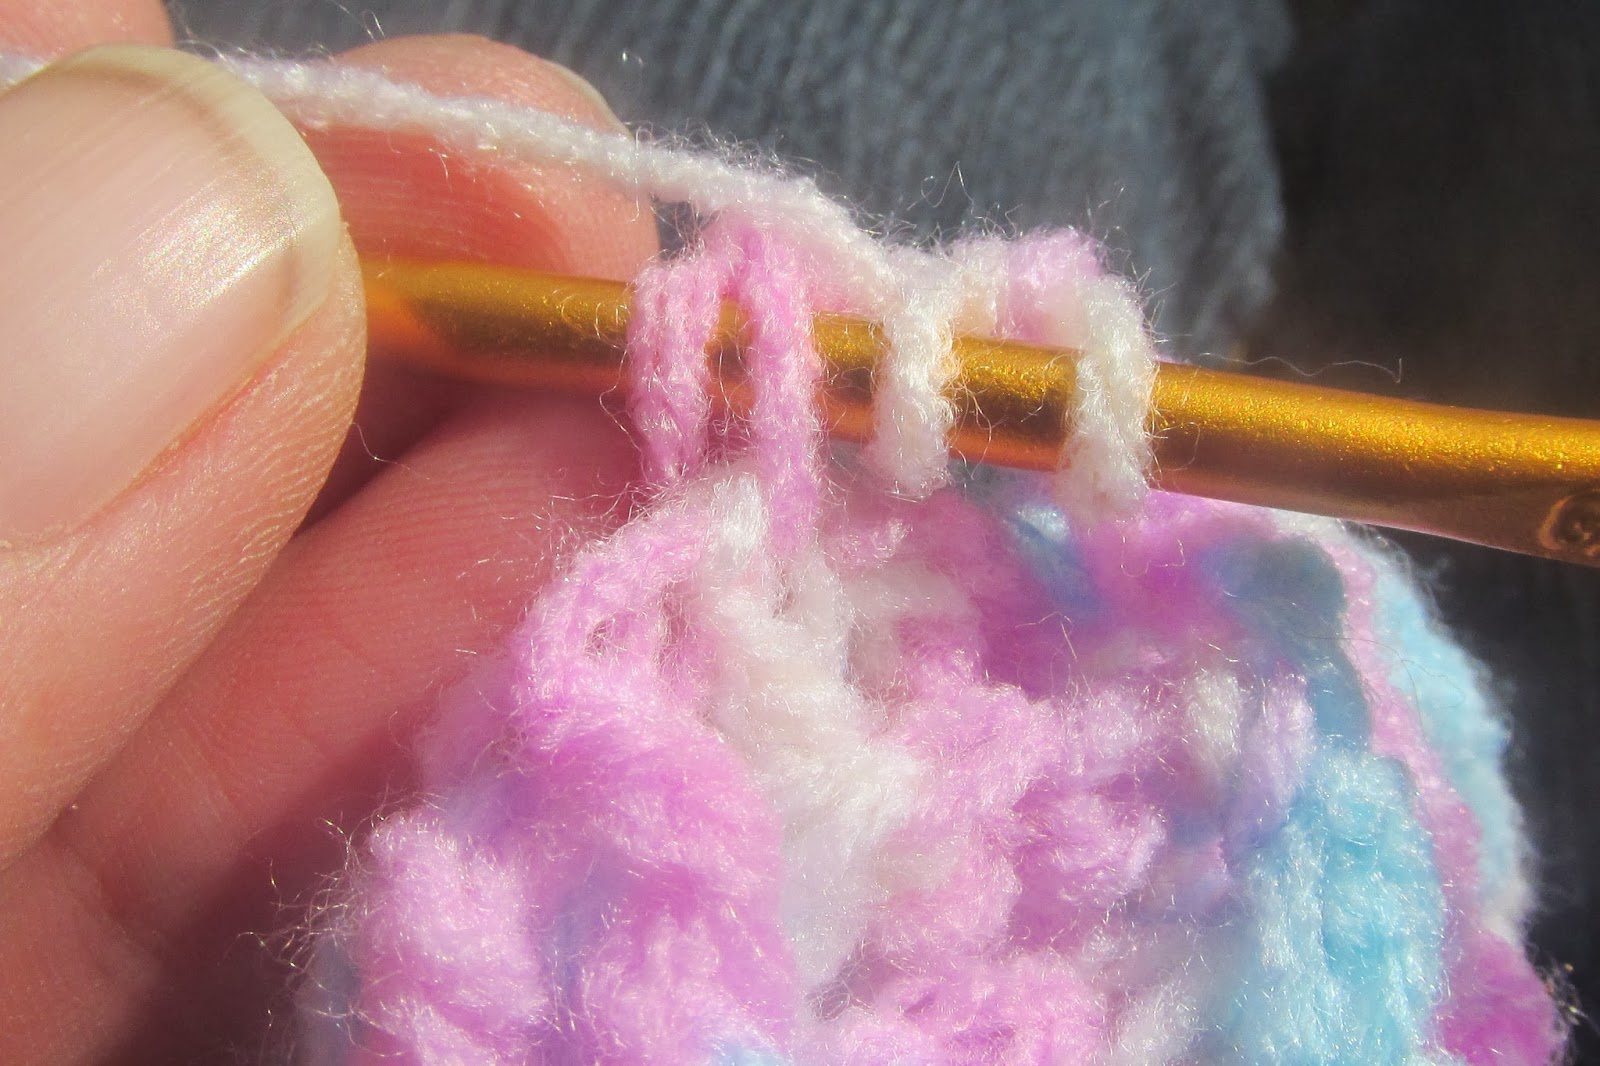
 Drop your working loop from the hook, insert the hook through the very first ch. through the hole where the tail starts. Do this from the front side, so that your right side will be facing when the joint is completed.
 Now pull the working loop through, snug up the working loop and ch 1.pull snug to finish the joint.
 You can see here how you actually have two ch3 next to each other, you will use the tail and a yarn needle to secure this closed.  Now look at the top edge of our tube, Beautiful, clear stitches, no goofy loops, but ALL the stretch of the fdc.  All those goofy loops, they are at the top, about to be worked over, hidden from view, to be forgotten, until you start the second leg warmer.
Rnd 2.  Ch3, FPDC over the 2nd ch3, BPDC over next 3, FPDC over next 3, all the way around. Finish round with 1 FPDC, slst to ch 3. ch3 to start next round
R3 to R5 Repeat R2,
R6 ch3, sk 1 dc, sc in the next,ch3, sk1 dc, sc in the next, around to the last dc. ch1, dc in the dc you started the round in. This will give you the elevation you need to start this round.
From here, you will be working in a spiral, with out joining your rounds.
R7 Ch2, sc in the ch 3 loop, ch 2, sc in next loop, all the way around.
R8. Ch 1, sc in next loop, ch1, sc in next loop around.
R9. Ch 2 sc in next ch space. ch 2, sc in next.Around
R10. Ch 3, sc in next loop. use a marker to indicate your first ch 3 loop. continue around, ch 3, sc in the loop
Repeat rounds 7 to 10 4 more times, until you have 5 of the ch1  rounds, you will end on a ch 3 round.
DC in the next sc, Dc in the ch3 space. around. join with a slst.
Ch3 FPDC over next dc, BPDC over next 3, work around. Finish the round with 1 fpdc, slst around the ch 3 at the beginning of the round. Repeat round 3 more times. Slst to the last fpdc,     Do not bind off.
Stirrup

 Ch 1, Yarn Over, and insert hook into the top of the last BPDC in the next set.  Complete DC, It will be virtually laying sideways across the end of the group of BPDC.

 Yarn over, and insert hook into the base of the last dc Made, We are doing FDC now.
But I want you to catch the two threads, so there will not be quire as much stretch.
Continue the FDC for a total of 9


Now we are going to attach these 9 to the other side, with the 10th FDC.
Look how the stirrup is coming off the side at a 3bpdc space, we will attatch it about 1/3 of the way arround. Skip the 2 fpdc groups, and the bpdc between them.


Insert hook in the top of the Last BPDC  of the next group.
 draw loop through, 2 loops on hook
Yarn over and insert hook into base of FDC of Stirrup. (as if making the next DC)
and now insert hook through the first BPDC of the group.  yarn over, and pull through both layers that are being joined.
You now have 4 loops on hook, and we can complete the dc, and the joining of our
 We Y/O, draw through the first 2 loops. Y/O again and pull through all three.
 It is just a smidge bulkier than a normal DC
 poke hook through the next fpdc, and slst to secure it.
 Cut yarn, and bury ends.  One down, one to go.
Allie is tickled, and eager to get all gussied up for a photo shoot, but she has to hold on to that enthusiasm until after school tomorrow.

Oh, in the process of getting this finished, the perfect name was offered by Cheryl Pledge Kardell.  May I present the "Zen Baby Legs"  legwarmers.